Tuesday, 11. June 2019
Mucus forming in the lungs during an infection is a normal physiological reaction. The goblet cells produce more mucus so pathogens can be quickly transported out of the system. At the same time, the mucous membranes become swollen because many immune defence cells are being transported to the site of the infection. More mucus and swollen mucous membranes constrict the bronchi, which is also where air flows. So breathing becomes more difficult. By doing certain exercises, mucus in the lungs can be mobilised so that it can be expectorated more easily and quickly. Every week we will present another one of the eight helpful exercises here on our PARI BLOG:
We asked Marlies Ziegler this question. She is a physiotherapist who specialises in respiratory physiotherapy and who every day works with patients who have chronic problems with clearing mucus from their lungs and bronchi. So she is well versed in effective exercises for mobilising mucus in the lungs. Not only are these exercises suitable for patients with chronic lung diseases such as COPD, cystic fibrosis, PCD and chronic bronchitis, they are also appropriate for times when the lungs and bronchi are acutely congested with mucus due to colds, bronchitis or pneumonia.
Marlies Ziegler knows from experience that the exercises work. The reason is that “the exercises have a positive effect on the flexibility of the chest, the spine and the ribs. Breathing is altered by this increased flexibility and the mucus can be cleared better.”
To achieve the best possible result, all of the exercises should be synced with your breathing. Syncing one’s breathing and movements can cause fluctuations in the bronchi in time with one’s breathing, enabling the air to get in behind the mucus. The mucus loosens and can be transported out of the lungs more easily. This works even better if you hold your breath for a short time after inhaling (if possible, slowly count to three).
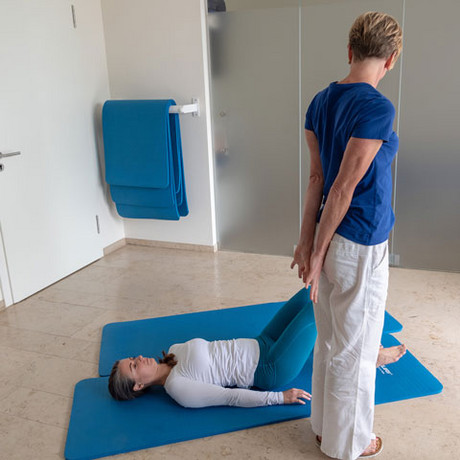
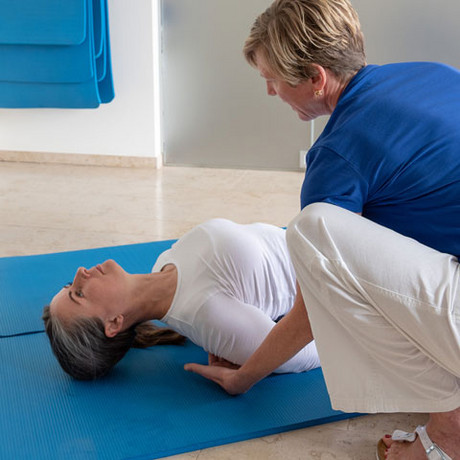
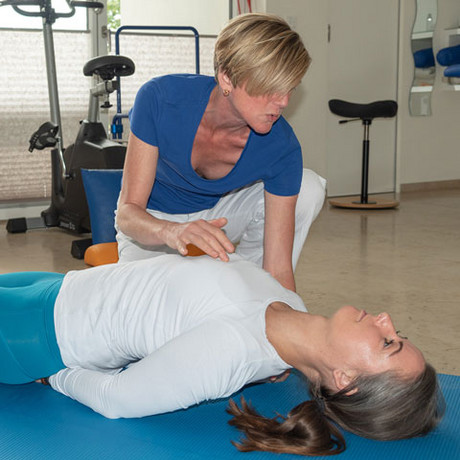
For the “fish” exercise the focus is on breathing. Breathing is restricted by the muscles working. The diaphragm has to work against the resistance of the torso muscles. This exercise stretches the chest muscles, activates the muscles between the shoulder blades and makes breathing easier because exertion is followed by relaxation. Caveat, you have to work hard when you’re a “fish” ;-)
How to do this exercise:


If the “active” version of the “fish” exercise is too difficult for you, or you are not flexible enough to do it, you can switch to the “supported” version. To do this, lie down on a rolled up towel placed at the level of the bottom of the shoulder blades. This is at about where a bra band would be.
Stay in the “fish” position for 8 to 10 breaths. Feel the effects of the exercise while lying flat on the mat.
About Marlies Ziegler
Marlies Ziegler works as a physiotherapist in private practice in Munich. She specialises in respiratory therapy. She has been treating patients with chronic obstructive and restrictive airway diseases such as asthma, COPD, cystic fibrosis (CF) and primary ciliary dyskinesia (PCD), for 20 years.
Exercise 1: Bow and arrow while lying down
Exercise 4: Diaphragm brige active
Exercise 6: Chest rotate and strech position
Note: The information in this blog post is not a replacement for treatment. The exercises described should be used as examples for respiratory therapy. PARI recommends that patients always coordinate with their doctor and physiotherapist.
An article written by the PARI BLOG editorial team.
© 2024 PARI GmbH Spezialisten für effektive Inhalation