Breathing exercises can be divided into breathing techniques and breathe-easy positions. Asthmatics should know both of these to better control breathing difficulties and attacks.
Here are 9 breathing exercises for asthma, all of which are easy to do in everyday life.
With breathing exercises, focus purely on your breathing. The breathing techniques can be used in any posture or situation (at home or out and about). Ideally, adopt a comfortable position.
Pursed lip breathing is an exhalation technique for breathing problems. This breathing technique involves loosely closing your mouth and allowing the air to flow out quietly. Follow your own individual breathing rhythm as you do this.

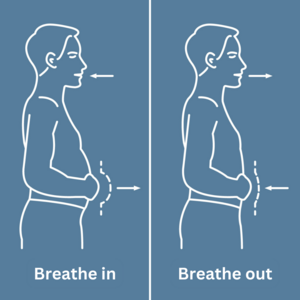
Abdominal breathing, also known as diaphragmatic breathing, aims to fill the lungs with air to their full capacity. This air is then completely expelled as we breathe out. This technique can help maximise the supply of oxygen and makes it easier to breathe.
Asthmatics should practise conscious breathing so that they can call on this breathing technique if they have an asthma attack. During an acute asthma attack, the small airways constrict to such an extent that normal breathing is significantly impaired. And then panic is added into the mix. More conscious breathing can mitigate respiratory distress.
For conscious breathing, get into a position in which you can breathe easily, slowly breathe in through your nose (ideally with the abdominal technique) and then breathe out slowly and as long as possible. Use the pursed lip technique to breathe out or make sounds like “sss”, “sh” or “fff”.
The basic principle of this breathing technique is – as the name suggests – breathing in and out through the left and right nostril in turn. To do this, close one nostril and then the other. Hold your right nostril closed with your thumb and the left nostril with your ring finger. Always count to 4 as you breathe in. Then hold your breath for about 2 to 8 seconds. Then breathe out calmly, counting to 8 as you do so. If you find it difficult to hold your breath, shorten this to however long works well for you.
As posture has a significant influence on how freely you can breathe, asthmatics should learn breathe-easy positions. It is recommended that you combine breathing techniques with breathe-easy positions.
The coachman position imitates the position in which coachmen used to sit back in the days of the horse and cart, when they would sleep hunched up on the bench at the front of the cart after a hard day’s work. To adopt the coachman position, sit on a chair and rest your elbows on your knees.
You are bound to have seen the goalkeeper position before in sprinters or other athletes, who often adopt this position after they have really exerted themselves. It is called so because it is reminiscent of a goalkeeper waiting for someone to try to shoot a goal. For the goalkeeper position, spread your legs and bend forwards slightly and support your hands on your knees.
To sit like a pasha, sit in an armchair with armrests. Stretch your legs loosely in front of you and put your arms on the armrests.

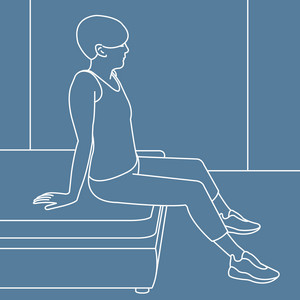
With this technique, sit at the edge of the bed and support yourself with your arms on the bed in a comfortable position.

To sit at a table, sit on a chair or a bench in front of a table and rest your arms on the tabletop. Rest your forehead on your lower arms or hands.
Note: The information in this blog post is not a treatment recommendation. The needs of patients vary greatly from person to person. The treatment approaches presented should be viewed only as examples. PARI recommends that patients always consult with their physician or physiotherapist first.
An article written by the PARI BLOG editorial team.
© 2025 PARI GmbH Spezialisten für effektive Inhalation